Thursday, May 30, 2013

Welcome to Seussville!

During my free time I love to craft, if you couldn't figure that out by now... but my real job is teaching. I am an ESL teacher in South Korea. I am one of the lucky teachers, to have my very own classroom. So, while my students were away on their field trip for three days I decided to decorate the classroom. I went with the Dr. Suess theme. 


The Classroom: Suessville

Inspired by "The Lorax"

Truffula Trees
To make the Truffula Trees I followed THIS tutorial by Nothing But Bonfires.

Inspired by "Oh The Places You'll Go"


 I hung laminated balloon guys and clouds from the ceiling. Up, up and away they go!

Bulletin Board Trim
I glued Dr. Seuss colored circles together to make a fun bulletin board trim.

"The Cat in the Hat"
Thing 1 and Thing 2 


I am happy with the way my classroom turned out and am excited to see the reaction of my students when they get back. 

This was super simple to do (just time consuming, but luckily I had time) and super cheap. I hope I can inspire you to get creative in your classroom, home, or party. Have fun crafting! 


Sunday, May 12, 2013

DIY Makeup Organizer


Living in another Country and not having the same wonderful craft stores that I can get back in America, I have been learning how to get creative. I am not going to let the lack of crafting materials I have, stop me from what I do best. That means I need to figure out how to use what I have.

I have been seeing wonderful DIY organizing ideas on Pinterest and it got me to thinking to make one for myself. I had an empty styrofoam container and some empty tin cans, so I decided I would try and see what I could do with them. 


You could use any container you can find around your house for this project. Got an empty shoe box, or tupperware laying around? Grab it and craft it up to make
 a masterpiece.

I modge-podged magazine pages to decorate mine. You could use scrapbook paper, fabric, newspaper, ... get the point? You can use anything that you can find. Do what you like, I know it will look great!


And there you go ~ A cute and simple makeup organizer. 

Have fun crafting!


Tuesday, April 30, 2013

DIY Scrap Fabric Bracelet


Have any extra fabric scraps laying around? This is a perfect project to use those pieces on. 

This bracelet is super simple to make and super cute. So go ahead and make a few and layer them up. 

They make as great gifts also!


The tutorial for this bracelet can be found here!

Have fun crafting!

Sunday, April 21, 2013

DIY Peter Pan Collar


Materials:

* Felt
* Ribbon, lace, or any material you want to embellish with
* Fabric snaps
* Scissors
* Needle and thread

Directions:
1. Draw out your template on a piece of paper. I recommend playing with it and trying it on until it fits the way you want before you cut it out on felt. I played around with my template until it laid the way I wanted it.
2. Cut out your collar on a piece of felt.
3. To embellish my collar, I decided to make a bow with some scraps of lace I had.
4. To make the bow fold it so that the two ends meet in the middle. Bind it down with a piece of string by wrapping it around.
5. Sew or glue a piece of lace in the middle part of the bow.
6. I added the little tails to form my bow. Once you have finished with the bow, sew it onto the middle part of your collar.
7. Add fabric snaps on the ends of your collar and then you are finished.

Super simple and super cute! You can have lots of fun making different kinds of collars. I decided to make a purple one and added metal washers for the embellishment. So now I have the perfect balance of sweet and sassy. Have fun crafting!


Thursday, April 11, 2013

Another Summer T-Shirt Vest


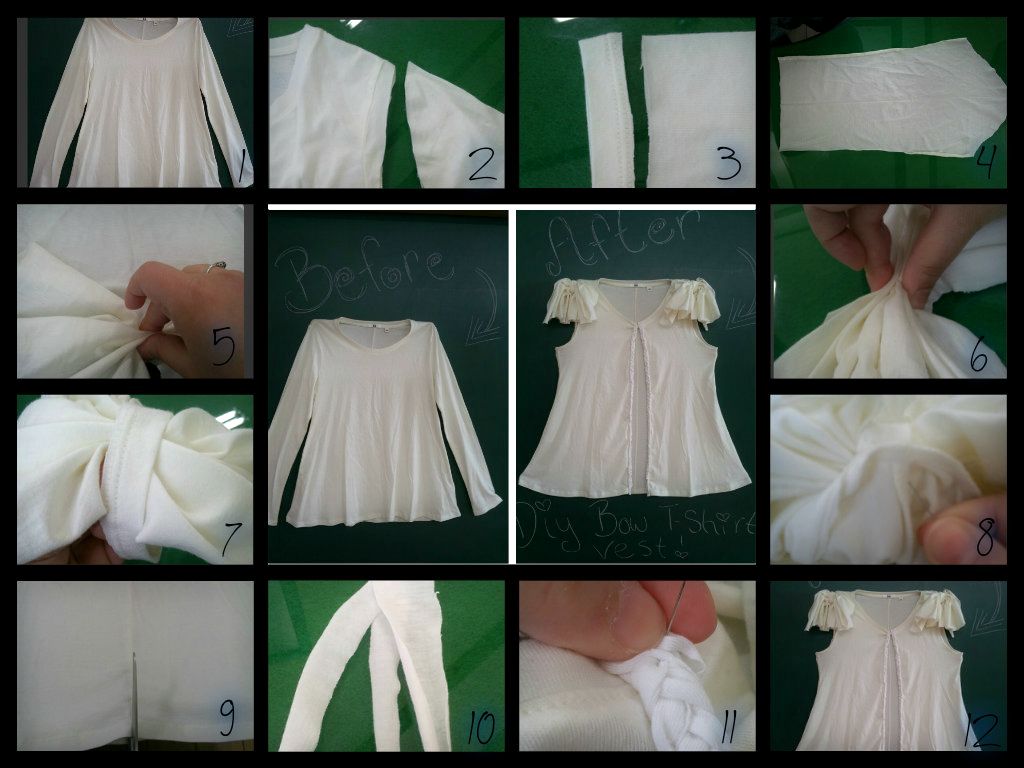
Ok, So if you could not tell, I love bows and apparently vests. So here is another super simple and cute T-Shirt Vest!


Materials:

* T-Shirt
* Extra fabric from another T-Shirt 
* Needle and thread or sewing machine
* Clothes snap
* Velcro (optional)
* Scissors

Directions:

1. Lay out your t-shirt on your work space.
2. Cut the sleeves off.
3. Lay out your extra fabric and cut out a sleeve using the sleeve you just cut off as your template.
4. Sew on your new cut out sleeve onto the shoulder part of your shirt.
5. Lay out the t-shirt once again.
6. Cut down the middle of the shirt to create a vest.
7. Using your old sleeves you will create a bow. 
8. Fold your sleeve in half and cut off the end of the fabric like shown above in box 2.2.
9. Sew together the two sleeves down the middle.
10. Gather the middle part of the fabric to create a bow.
11. Using your other fabric cut a strip and wrap it around the middle of the bow. 
12. Sew it together.
13. Sew on your snaps on the top collar part of your vest.
14. Sew on the bow on the top layer of your vest right in the middle where you sewed on your snaps.
(I had to use Velcro on the tops of my bows so that they would stay the way I liked it without sagging. This step is up to you.)
15. Viola! Yet another cute and simple summer vest!


Tuesday, April 9, 2013

DIY Bow T-Shirt Vest

Summer is soon approaching so I thought it was time to revamp my winter wardrobe into summer. I love vests because I can pair it with anything jeans, skirts, dresses, you name it. Here is a simple T-Shirt vest that is cute and super easy to make!


Materials:

* Long Sleeve T-Shirt
* Needle and Thread
* Scissors
* Strips of Fabric for Embellishing (optional)

Directions:

1. Lay out your long sleeve shirt on your working space.
2. Cut the sleeves off.
3. Cut the end of the sleeve seam off.
4. Cut the sleeve in half.
5. Gather the sleeve together starting from the bottom middle part of the sleeve.
6. Pinch together in the middle.
7. Wrap the sleeve seam that you cut off in step 3 in the middle part of your bow.
8. Sew the bow onto the shoulder part of the shirt.
(These next steps are optional, if you do not wish to make a vest then skip the rest of these steps.)
9. Cut the front part of the shirt in half in the middle.
10. To add a little something extra to your vest, braid three strips of fabric. Make sure it is long enough to add to the  middle seams of the vest.
11. Sew the braided strip down the middle of your vest.
12. Ta-Da! A cute and super simple summer vest!


Sunday, April 7, 2013

DIY Necklace Holder


Materials:

* Tree Branch
* Rope, Twine, Ribbon, or String
* Tacks, Screws, or Nails
* Hot Glue Gun or Super Glue
* Necklaces

Directions:

1. Find a tree branch from outside and trim it down to the way you like it. 
2. Glue your rope on the ends of the branch.
3. I wrapped the rope around the ends a few times to give it a little more sturdiness and to give it character. 
4.To give it some more notches to put more necklaces on, I added a few tacks to the branch to hold all of my necklaces. 
5. Hang up and enjoy!

With this project you can really do anything with it. Keep it simple or make it colorful by painting the wood and adding embellishments. Have fun with it and be creative. The best part about this project is that it is super cheap and cute. 

Have fun Crafting!